
Adding your FSU email account to Thunderbird
You must have or upgrade to Thunderbird 78 for this to work. Choose Help->About Thunderbird to find your Thunderbird version number. Note version 68 will not upgrade to 78, you must do so manually. Download link for Thunderbird 78 is at : https://www.thunderbird.net.
- Open Thunderbird, in the top right navigation dashes click 'Options'.
- Click the 'Account Settings' option.
- In the bottom left corner of the newly opened window click the 'Account Actions' drop down, and choose the 'Add Account' option.
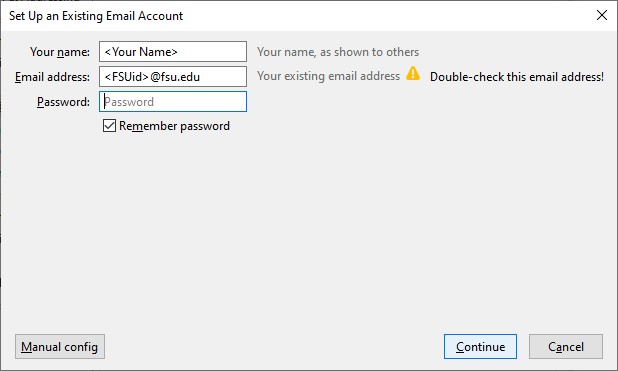
- In the 'Set Up an Existing Email Account' box, fill in your information, including your fsu email password (not shown in picture), then click 'Continue'
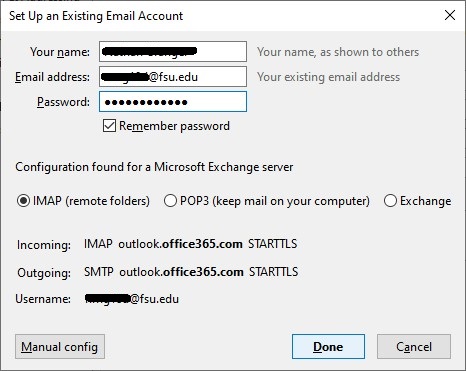
- You should see settings, like in the following picture, appear below where you filled in your information, click 'Done'.
Recommended Sync Settings
- In the top right navigation dashes click 'Options', click 'Account Settings'.
- Click 'Synchronization and Storage' under the new account.
- Take the check out of 'Keep messages in all folders ...'.
- Change the radio selection to 'Synchronize the most recent 30 days'.
- Put check in 'Don't download messages larger..' if not all ready checked.
- Click OK. Close Thunderbird. Wait 10 seconds and relaunch
Change Outgoing Email Address
- In the top right navigation dashes click 'Options', click 'Account Settings'.
- Click the newly created account. Change 'Email Address' to your desired email address. Must be one of the valid aliases for your account
Change Authentication Method to OAuth2
- In the top right navigation dashes click 'Options', click 'Account Settings'.
- Click 'Server Settings' under the new account. Change 'Authentication Method' to 'OAuth2'
Change Outgoing Server to smtp.office365.com and set OAuth2
Correct server may be set all ready. Still make sure to set OAuth2.
- In the top Menu nav click 'Tools'-->'Account Settings'.
- At the bottom of the left navigation window click 'Outgoing Server (SMTP)'.
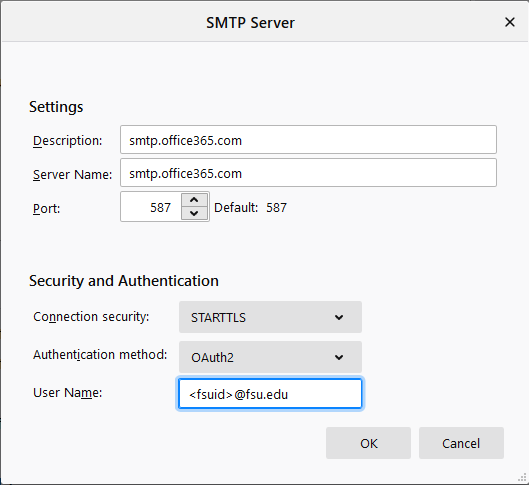
- If you see a 'smtp.office365.com' server option select it (click it) and then click the 'Set Default' buttton. If you do not see the 'smtp.office365.com' server click the 'Add' button and fill in the settings as in the following image then click 'OK'. Once added select the 'smtp.office365.com' server and click the 'Set Default' button.
- To verify your account is using this outgoing server click the account in the left navigation menu and verify that 'Outgoing Server (SMTP):' is set to 'smtp.office365.com' server, else change it.
- On the first send you may be prompted to input your password, input your current FSU email password. You should now be all set!