
How to create your digital signature (and use it) in Adobe Acrobat
Using your Digital Signature: (This assumes you have previously created a digital signature, instructions below.
-
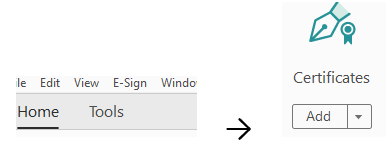
In the top menu bar select ‘Tools’ and then select ‘Certificates’ (this will take you back to the document but you will have an added tool bar at the top of the page).
-
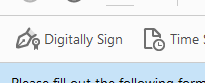
Select the ‘Digitally Sign’ option from the top tool bar, this will change your cursor to select mode, scroll to where you want to sign and highlight that area
-
In the next pop up box ‘Sign with a Digital ID’, select the digital ID/cert file you created (instructions below) and click ‘Continue’
-
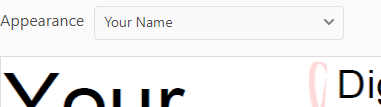
Make sure the ‘Appearance’ drop down has the signature that your created selected, not the ‘Standard Text’ option. Fill in your password and click the ‘Sign’ button
-
Your document should now be signed!
Creating a Digital Signature:
-
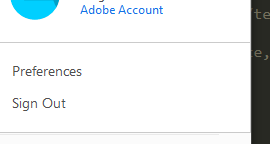
Open Acrobat, in the top right corner click your profile ‘circle’ (blue circle)

-
Click ‘Preferences’ from the drop down menu
-
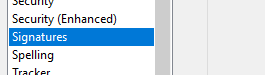
In the left menu bar of the Preferences box select ‘Signatures’
-
Click the ‘More…’ button in the ‘Creation & Appearance’ box

-
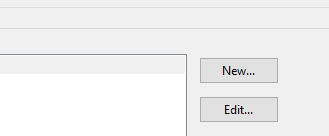
Closer to the bottom of the ‘Creation & Appearance Preferences’ box, click ‘New’
-
In the ‘Configure Signature Appearance’ box for the ‘Title’ just enter your name (configure the other settings to your liking) and click the ‘Ok’ button
-
Click the ‘Ok’ button in the bottom of the ‘Creation & Appearance Preferences’ box.
-
You should now be back in the ‘Preferences -> Digital Signatures’ box, select the ‘More…’ button in the ‘Identities & Trusted Certificates’ section

-
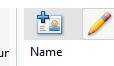
You will see a default digital ID with a ‘Issuer’ name of ‘MS-Organization-Access’ or something of the like, ignore this ID, and click the + graphic that is above the ‘Name’ column
-
Select the radio button that says ‘A new digital ID I want to create now’, click ‘Next’
-
Leave the already selected ‘New PKCS#12 digital ID file’ button selected and click ‘Next'
-
Fill in your information in the ‘Add digital ID’ box and click ‘Next’
-
Fill in a password for the ID file, click ‘Finish’
-
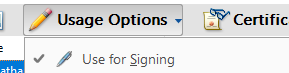
Back in the ‘Digital ID and Trusted Certificate Settings’ box, select the cert you just created by clicking it, then click the ‘Usage Options’ drop down and select ‘Use for signing’
-
You can now exit out of all of the ‘Preferences’ pop up boxes and you have a digital signature!